SSL is an essential part of creating a secure Apache site. SSL
certificates allow you encrypt all the traffic sent to and from your
Apache web site to prevent others from viewing all of the traffic. It
uses public key cryptography to establish a secure connection. This
means that anything encrypted with a public key (the SSL certificate)
can only be decrypted with the private key (stored only on the server)
and vice versa.
'
Once you have OpenSSL installed, just run this one command to create an Apache self signed certificate:
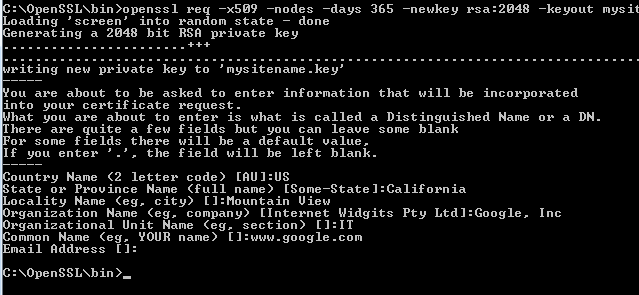 You
will be prompted to enter your organizational information and a common
name. The common name should be the fully qualified domain name for the
site you are securing (www.mydomain.com). You can leave the email
address, challenge password, and optional company name blank. When the
command is finished running, it will create two files: a mysitename.key
file and a mysitename.crt self signed certificate file valid for 365
days.
You
will be prompted to enter your organizational information and a common
name. The common name should be the fully qualified domain name for the
site you are securing (www.mydomain.com). You can leave the email
address, challenge password, and optional company name blank. When the
command is finished running, it will create two files: a mysitename.key
file and a mysitename.crt self signed certificate file valid for 365
days.
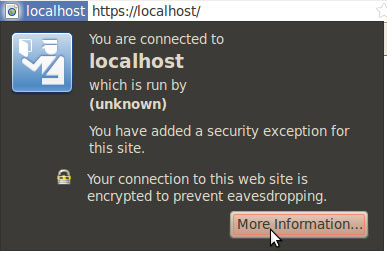 If the Apache site is public, you can use our SSL Checker
to verify that it is installed correctly (ignoring the warning that it
is not trusted because it is self signed). Otherwise, just go to the
website in your web browser using https in the address bar
(https://www.mysitename.com) and verify that the certificate is being
given out by the server by clicking the certificate icon (after
clicking through the warnings).
If the Apache site is public, you can use our SSL Checker
to verify that it is installed correctly (ignoring the warning that it
is not trusted because it is self signed). Otherwise, just go to the
website in your web browser using https in the address bar
(https://www.mysitename.com) and verify that the certificate is being
given out by the server by clicking the certificate icon (after
clicking through the warnings).
When to Use a Self Signed Certificate
You should never use a self signed certificate on an e-commerce site or any site that transfers valuable personal information like credit cards, social security numbers, etc.An SSL certificate is necessary for more than just distributing the public key: if it is signed by a trusted third-party, it verifies the identity of the server so clients know they aren’t sending their information (encrypted or not) to the wrong person. So what is a self signed certificate? It is a certificate that is signed by itself rather than a trusted third party. Isn’t that bad? In most cases, yes. You will almost never want to use a self signed certificate on a public Apache server that requires anonymous visitors to connect to your site because they could easily become a victim of a man-in-the-middle attack. However, self signed certificates have their place:
- Self signed certificates can be used on an Apache development server. There is no need to spend extra cash buying a trusted certificate when you are just developing or testing an application.
- Self signed certificates can be used on an intranet. When clients only have to go through a local intranet to get to the server, there is virtually no chance of a man-in-the-middle attack.
- Self signed certificates can be used on personal sites with few visitors. If you have a small personal site that transfers non-critical information, there is very little incentive for someone to attack the connection.
'
Generate Your Apache Self Signed Certificate
Great! So now you know when to use an Apache self signed certificate and when not to. Now, let’s create one: First, we need to make sure OpenSSL is installed. If you are installing the self signed certificates on Windows, grab the Windows version of OpenSSL (If you get an error when you run the installer, you may need to download the Visual C++ 2008 Redistributables listed on that page first). If you are on another type of server, try running “openssl” on the command line to see if OpenSSL is already installed. If it is not, you will need to download a package or compile it from its source.Once you have OpenSSL installed, just run this one command to create an Apache self signed certificate:
openssl req -x509 -nodes -days 365 -newkey rsa:2048 -keyout mysitename.key -out mysitename.crtInstall Your Self Signed Certificate
Now, you just need to configure your Apache virtual host to use the SSL certificate. If you only have one Apache virtual host to secure and you have an ssl.conf file being loaded, you can just edit that file. Otherwise, you will need to make a copy of the existing non-secure virtual host, paste it below, and change the port from port 80 to 443.- Open your Apache configuration file in a text editor. Depending on your operating system and Apache version, it will be located in different places but you will usually find it at /etc/httpd/httpd.conf. On a Windows machine, you will usually find it at C:\Program Files\Apache\Apache2\conf\httpd.conf
- In most cases, you
will find the <VirtualHost> blocks in a separate file in a
directory like /etc/httpd/vhosts.d/ or /etc/httpd/sites/. Add the lines
in bold below. <VirtualHost 192.168.0.1:443>
DocumentRoot /var/www/website
ServerName www.domain.com
SSLEngine on
SSLCertificateFile /etc/ssl/crt/primary.crt
SSLCertificateKeyFile /etc/ssl/crt/private.key
SSLCertificateChainFile /etc/ssl/crt/intermediate.crt
</VirtualHost> - Change the names of the files and paths to match your certificate files. Save the changes and exit the text editor.
- Restart your Apache web server using one of the following commands: /usr/local/apache/bin/apachectl startssl
/usr/local/apache/bin/apachectl restart
Check the Apache Self Signed Certificate Installation
If the Apache site is public, you can use our SSL Checker
to verify that it is installed correctly (ignoring the warning that it
is not trusted because it is self signed). Otherwise, just go to the
website in your web browser using https in the address bar
(https://www.mysitename.com) and verify that the certificate is being
given out by the server by clicking the certificate icon (after
clicking through the warnings).